2. 3D design software – Introduction
3D printable models may be created with:
(a) a computer-aided design (CAD) package, via
(b) a 3D scanner, or by
(c) a plain digital camera and photogrammetry software.
3D printed models created with CAD result in reduced errors and can be corrected before printing, allowing verification in the design of the object before it is printed.
As shown in the diagram below, a file may need to be translated to an accepted format for 3D printing. This may involve taking out extra data, modifying the file format, and slicing (layering) the data. Software programs such as Blender, an open source 3D creation suite, will accept and translate many file formats.
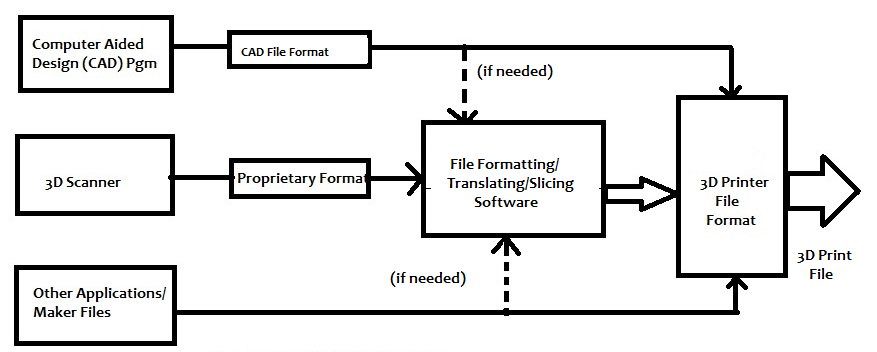 Image 2.1: Generating 3D printer files [source]
The same article, “Introduction to 3D Printing: History, Processes, and Market Growth”, offers, also, a table that presents a list of some of the 3D print file formats in use:
| *.STL | Stereolithography; 3D single color (one extruder ~1980s) |
| *.WRL | Vermal; multi-color (supports more than one extruder) |
| *.OBJ | Open source 3D geometric format |
| *.X3G | MakerBot format |
| *.PLY | Scanner output |
| *.3MF | 3D manufacturing format - 3MF Consortium specification (introduced in 2015, and still in use) |
Table 2.1. Some 3D Print file formats
There are numerous CAD programs available – some are freeware, some cost quite a bit of money. Of course, they all have their pros and cons. Here is a list of some of the most common accessible to educational/youth establishments:
– Blender
– Sketchup
– TinkerCAD
– FreeCAD
For an extended list of 3D modeling software you can refer to the following article: https://en.wikipedia.org/wiki/List_of_3D_modeling_software.
Sources:
[1] https://en.wikipedia.org/wiki/3D_printing
[2] https://www.allaboutcircuits.com/news/introduction-to-3d-printing-history-processes-and-market-growth